

How To Do The Best Camo Paint
How to Paint Camo on Vehicles
by Contributing WriterUpdated June 12, 2017
A camouflage paint job on a Vehicles really sets a bike apart from the crowd. This blazon of pigment job can be in honor of time served in the armed forces, a souvenir to friend in the army or only a smashing way to spice up your Vehicles. Creating camo on your wheel is not as difficult as it may seem. This is particularly true if you lot use hand painting techniques. While this may not look as slick as an airbrush paint job, you lot will find y'all have a lot more than command over the paint. Another reward is that this style of painting costs less and is quicker and easier to clean up.
Under The Hood:
- How to Paint Camo on Motorcycle
- How do I Pigment Camo on an ATV?
- How to Paint Camo on a Car
How to Paint Camo on Motorcycle
Tape trash bags effectually all the chrome and any part of the motorbike that you don't desire paint on. Sand the areas y'all wish to pigment. Y'all don't demand to remove all the paint, simply scuff it upwardly plenty so that you tin can get a new coat of paint to stick. Spray the sections yous wish to paint with paint primer. Allow this dry overnight. Spray the bicycle with forest green enamel auto paint. Permit the wood green pigment dry for two hours.
Paint pocket-size ovals of calorie-free dark-brown enamel on elevation of the forest green. Space these at least ii to 3 inches autonomously from one another. Make them look like camouflage patterns by adding rounded half circles and blob-like shapes along the side of the ovals. Let this dry for 2 hours.

Mix two cups of navy blue enamel with ii cups of forest green to create a very night light-green. Add together this in a pattern similar to the light chocolate-brown enamel. Nevertheless, these cover-up shapes should exist near half as pocket-sized as the light brown shapes. Let the paint dry out for 2 hours.
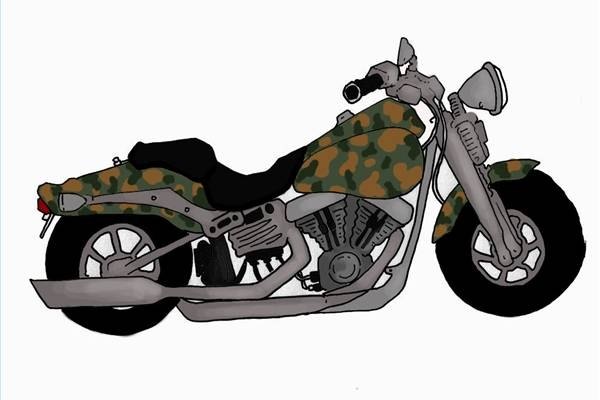
Spray all the areas painted with enamel sealer to ensure that the paint stays on. Let this dry overnight, so carefully remove the tape and garbage bags. You can use a solvent like "Goo Gone" on the chrome is the tape leaves behind any residue.
Items you lot volition demand
-
Garbage numberless
-
Sandpaper
-
Painter'south tape
-
Enamel spray primer
-
Enamel car spray pigment
-
Enamel automobile paint
-
Enamel sealer
-
Paintbrushes
-
Turpentine
-
Solvent
How do I Paint Camo on an ATV?
Clean the plastic surface of your ATV using a balmy soap and hot h2o. Allow the ATV to air dry out.
Sand the plastic surface using a 180-dust sandpaper. This helps remove sometime pigment and rust.
Scrub ATV plastic using a scuff pad and Scuff Magic solution. Give your ATV another round of sanding with 180-grit sand paper in club to remove any left over sports of pigment, rust, or crust.
Make clean the sanded plastic using a plastic cleaner. Spray the plastic cleaner on the plastic of your ATV and permit the cleaner to sit for about one infinitesimal. Wipe the cleaner off of the plastic using a clean towel to remove grit and oil from the plastic.
Utilize a coat of Plastic Magic to the surface of the ATV. Allow the get-go coat to dry completely and utilise a second coat.
Apply a pigment primer to the entire surface of the ATV. Let the primer to fully catalyze with the ATV surface.
Describe the camouflage blueprint on the ATV surface using a lite pencil. Draw any desired shapes or sizes. Camouflage print tin be fabricated of large or small shapes. Typically, well-nigh camouflage print features a variety of rounded shapes.
Open the can of the lightest paint color and employ the paint to the ATV using a medium sized paint brush. Apply paint to about one tertiary of the shapes you drew in Step 7. Don't worry too much virtually painting perfectly or choosing the correct shapes. Camouflage should expect slightly random. Let the paint to dry and add a second glaze.
Utilize the medium-colored camouflage pigment to the ATV. Color in about half of the remaining shapes. Don't worry if you paint over some of the edges of the lighter colored camouflage. Allow this paint to dry and add together a second coat.
Apply the darkest color of cover-up paint and make full in all of the remaining shapes. Brand certain that there are no spots left where the primer shows through. Add a second coat of pigment afterwards the first coat of paint dries.
Apply two coats of clear paint to the plastic one time the camouflage dries completely.
Items you will need
-
three colors ATV paint
-
Paint castor
-
Primer
-
180-grit sandpaper
-
Scuff pad
-
Scuff magic solution
-
Warm water
-
Balmy soap
-
Plastic cleaner
-
Pencil
How to Paint Camo on a Car
Mask off parts of the machine that will non be painted. Tape paper over the windshield, rear window and other windows and tires. Tape over headlights, tail lights, the grill and other trim pieces.
Sand the entire motorcar to prepare for paint. For sanding the roof, open the motorcar doors and stand on the door sills to reach the center. Use a ladder to spray the height of the car, making sure the ladder doesn't touch the sides of the car. Spray the tops of the roof, hood and torso starting time then move onto the remaining parts of the auto.
Spray two coats of medium-gray paint on the entire motorcar before using whatever stencils. This should cover all of the primer and give you a base coat to first with. Make certain all of the primered surface is covered.
Spray black and brownish paint on the lower half of the car, holding the tin can at least 10 to 12 inches from the surface to get a soft event. Spray the paint in sections about 1 foot apart so that the grass stencils placed on superlative of this take a little groundwork color other than the greyness base coat.
Place the thin stencils against the auto and paint them black. This stencil makes short black lines for a background under the grass stencils. Use these stencils starting from the lesser of the machine to over halfway up the side of the car. This pattern volition extend up further than the grass stencils.
Using the grass stencil, start at the bottom of the car with tan-colored paint. Hold the stencil nearly an inch from the surface of the auto so that when the paint is sprayed, there are no hard lines defining the grass. Employ this technique every three anxiety on the car from the bottom to the halfway signal. Offset at the forepart of the motorcar and work to the rear bumper.
Spray a light-chocolate-brown colour using the grass stencil again, but this time identify the stencil directly on the car to become a sharp, defined image. Use this stencil in the same area as the terminal stride, placing it slightly to the side of the concluding pattern, but still partially covering the other color.
Apply ii or three coats of clear on the car and allow it to dry out. This protects the pigment and helps the camo concluding longer without fading or peeling.
Items yous will need
-
Camouflage stencil kit
-
Masking tape
-
Masking paper
-
Sandpaper (80- and 120-grit)
-
Sanding block
-
Ladder
-
Automotive primer
-
Automotive pigment
-
Automotive clear coat

How To Do The Best Camo Paint,
Source: https://itstillruns.com/how-to-paint-camo-on-vehicles-10915.html
Posted by: jacobsyoublive.blogspot.com
0 Response to "How To Do The Best Camo Paint"
Post a Comment